

Raspberry Pi
Wireless Server for Repetier
Webcam
- UPGRADE -
Parts for this section
Wireless 3D Printer Server
Now that you can control your 3D printers from anywhere in the house, what can possibly be cooler than being able to keep an eye on it from anywhere!
Here's how ...
-
Raspberry Pi Camera
-
Connect the RaspiCam to the Raspberry Pi as follows ... WARNING: connecting it can damage the camera
Start and use your new Webcam
-
In the Terminal window type:
sudo /etc/init.d/mpjgstreamer start this launches the application
cd /home/pi/mjpg-streamer/mjpg-streamer-experimental to change the directory
./mjpg_streamer -o "output_http.so -w ./www" -i "input_raspicam.so" this starts the raspicam camera
sudo /etc/init.d/mpjgstreamer stop this stops the raspicam application
Congratulations !!! You've now got a webcam to keep an eye on things remotely.
To setup the webcam to be used in Repetier Server you must open Repetier Server in a web browser and go to Settings menu and then to the Webcam tab...
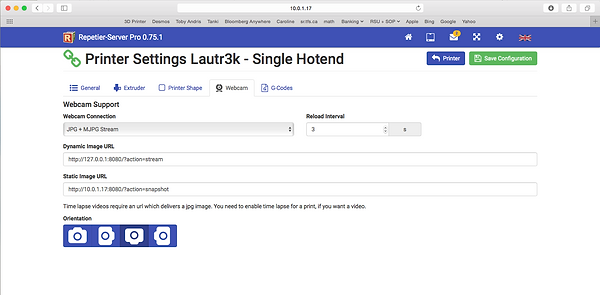
Enter the required URLs using your own ip address:
-
Dynamic Image URL: http://10.0.1.17:8080/?action=stream
-
Static Image URL: http://10.0.1.17:8080/?action=snapshot
Select the "Webcam Connection" from the drop down menu
Install MJPG-streamer video camera
In a Terminal window you will need to type a series of commands as follows:
-
You must download and install cmake if not yet done (see Trouble Shooting)
-
To download the updates, type (note: that it's LIBV4L-DEV as opposed to LIBV41-DEV !):
cd /Download/cmake-3.4.1/ # make sure to be in the correct directory !
sudo apt-get install libjpeg8-dev imagemagick libv4l-dev make gcc git cmake g++
git clone https://github.com/jacksonliam/mjpg-streamer.git # To download MJPG-streamer
cd mjpg-streamer/mjpg-streamer-experimental/ # change the directory
cmake -G "Unix Makefiles" # unpack and build the MJPG-streamer
make
sudo make install # install the built files
-
Make sure to enable the raspicam, this is done by typing sudo raspi-config and chosing Enable Camera
-
You will need to reboot the Raspberry Pi after this ... remember to restart the Repetier Server after rebooting
To make MJPG-streamer start up automatically at bootup (Optional):
-
In the Terminal window type the following commands
cd /etc/init.d
sudo wget http://www.repetier-server.com/en/software/extras/mjpgstreamer-init-debian/mjpgstreamer
-
We need to edit the mjpgstreamer script since we're using RaspiCam as opposed to USB webcam:
In a Terminal window type:
gksu nautilus
Locate the mjpgstreamer file in /etc/init.d directory and then open the file to edit the script
In the script, replace "input_uvc.so" with "input_raspicam.so"
Save As mjpgstreamer in the folder /home/pi/Desktop to make it easy to find
This may be redundant but, In a Terminal window type:
gksu nautilus
mv /home/pi/Desktop/mjpgstreamer /etc/init.d/mjpgstreamer
sudo chmod 755 mjpgstreamer
sudo update-rc.d mjpgstreamer defaults
To use MJPG-streamer by starting it manually each time you reboot your Raspberry Pi:
-
Run the MJPG-streamer application as a process in the background:
cd ~/
/home/pi/mjpg-streamer/mjpg-streamer-experimental/mjpg_streamer -i "input_raspicam.so" -o "output_http.so -w /usr/local/share/mjpg-streamer/www" -b
To start the Raspicam, type the following command in a Terminal window:
sudo /etc/init.d/mpjgstreamer start


Trouble Shooting
Installing the 8 megapixel camera
-
Type the following commands:
sudo apt-get install cmake
git clone https://github.com/raspberrypi/userland.git
cd userland
./buildme
-
Then update the Kernel by typing:
sudo rpi-update
-
Test the camera by typing:
raspistill -o cam.jpg
Setup the Raspicam on Repetier Server
Download and Install: CMAKE (if not already done)
This software is needed to use the "cmake" commands.
I've left the directory from which you're working since you must install software at correct location.
-
Create a folder
pi@raspberrypi ~ $ mkdir Download
pi@raspberrypi ~ $ cd Download
-
Download necessary file and extract it
pi@raspberrypi ~/Download $ wget https://cmake.org/files/v3.4/cmake-3.4.1.tar.gz
pi@raspberrypi ~/Download $ tar -xvzf cmake-3.4.1.tar.gz
-
Compile and install cmake
pi@raspberrypi ~/Download $ cd cmake-3.4.1/
pi@raspberrypi ~/Download/cmake-3.4.1 $ sudo ./bootstrap
pi@raspberrypi ~/Download/cmake-3.4.1 $ sudo make
pi@raspberrypi ~/Download/cmake-3.4.1 $ sudo make install
Update & Upgrade
Its's a good idea to do this just in case new releases are published
-
In a terminal window, type the following commands:
pi@raspberrypi ~ $ apt-get update
pi@raspberrypi ~ $ apt-get upgrade
-
For more information about Raspicam:
https://www.raspberrypi.org/learning/getting-started-with-picamera/worksheet/

-
Test the RaspiCam by typing the following command in the Terminal window: