top of page


Raspberry Pi
Wireless Server for Repetier
Anchor 1
Anchor 2
Parts for this section
3D Printer Server
This device can be used to setup your 3D printer in a location that's away from your computer or laptop (such as a basement or garage) and control it remotely without needing a dedicated second computer.
In this project, we use a Raspberry Pi 3 with a wireless connection as the dedicated computer. You can also setup a Raspberry Pi video camera to keep an eye on your print job (upgrade project).
All of this can be controlled remotely via a computer or smart phone !
A great setup for running long print jobs !
-
Raspberry Pi 3 ... Raspberry Pi 2 would also work
-
Wireless 802.11N USB adapter
-
Power Supply (5V 2A) ... For Raspberry Pi
-
8GB Mico SD class 10 card
-
External monitor with HDMI socket
-
Mouse
-
Keyboard
-
Raspberry Pi Camera ... Optional
-
Project box for Raspberry Pi ... Optional

3D Printer Server
Step 1. Basic setup
-
Plug in the keyboard to one of the USB ports in the Raspberry Pi
-
Plug in the mouse to another USB port
-
Make sure the power is off on the monitor and connect the HDMI cable from monitor to Raspberry Pi
-
Plug in the power supply (5V 2A) to the wall and then connect it to the Raspberry Pi
-
Turn the monitor on
Step 2. Installing the Operating System
-
Either buy an SD card with NOOBS (New Out Of Box System) installed or:
-
Download it from: https://www.raspberrypi.org/downloads/noobs/
-
Format your SD card using SD Formater 4.0 for Windows ... for Mac use Disk Utility app in "Other" from Launchpad
-
Drag all the files in the extracted NOOBS folder and drop them onto the SD card drive
-
-
Insert the SD card into the SD slot in the Raspberry Pi
-
Plug in the Power Supply to the Raspberry Pi:
-
A window with a list of different operating systems will appear
-
Select Raspbian (tick the box) and click "Install"
-
-
Once complete (can take a while) "Raspi-Config" will open ... this is the Raspberry Pi configuration menu:


Step 4. Update Raspberry Pi
-
To download the updates, type:
sudo apt-get update
sudo apt-get upgrade
sudo apt-get install build-essential cmake pkg-config
sudo rpi-update
sudo reboot
Step 5. Instal Repetier Server
-
Login to Raspberry Pi
-
Start the GUI, type:
startx <Enter>
-
Start the Terminal window
-
Download Repetier Server :
wget http://download.repetier.com/files/server/debian-armel/Repetier-Server-0.75.1-Linux.deb
-
Install the ".deb" file, type:
sudo dpkg -i Repetier-Server-0.75.1-Linux.deb
-
Optional (if required): Change the port in the configuration file, type:
sudo vi / usr/local/Repetier-Server/etc/RepetierServer.xml
Port should be "80"
<?xml version=”1.0″ encoding=”UTF-8″ standalone=”yes”?>
<server>
<installation-directory>/usr/local/Repetier-Server/</installation-directory>
<storage-directory>/var/lib/Repetier-Server/</storage-directory>
<default-language>en</default-language>
<port>80</port>
<logging>true</logging>
<backlog-size>1000</backlog-size>
</server>
-
Start the server service, type:
sudo update-rc.d RepetierServer defaults
sudo service RepetierServer start
Step 6. Access Repetier Server from a remote computer
-
On any computer on the network:
-
Make sure that the Raspberry Pi is on the same network (not a guest netowork !) as the computer you're using
-
Same router doesn't mean same network ! ... look at the network name
-
Enter the Raspberry Pi's IP address on the web browser
-
Don't forget to add the port number after the IP address (e.g. :3344)
-
192.168.0.166:3344
-
... or another example 10.0.1.17:3344
-
-

Step 7. Install your printer
-
Access the Repetier Server from another computer using the webbrowser (step 6)
-
Click on the home icon (looks like a house) in the menu bar at the top of the screen
-
Go to Printer (selected) ... then click on the button in to top right in the red box below
-
Once complete the web interface looks like this:
-
If this screen doesn't appear, then at the command prompt type: sudo raspi-config <Enter>
-
Set all you basic data such as time, regions, etc
-
Enable Raspberry Pi camera board
-
Exit menu by pressing the <Tab> to get to the end
-
The unplug the power to reboot
-
-
Select "Enable Camera" and then "Yes" followed by a reboot of the Raspberry Pi
Additional explanations are available on a video at: https://www.raspberrypi.org/help/noobs-setup/
Step 3. Logging-in and Graphical User interface (Method A)
-
The default login is:
-
username: pi
-
password: raspberry
-
Nothing appears when typing password in Linux as a security feature
-
-
To get the graphic user interface (GUI) to appear type: startx <Enter>
-
Click on "Menu" logo with looks like a respberry at the top left corner of the screen
-
Select "Preferences"
-
Select "WiFi Configuration"
-
Click on "Scan"
-
-
Select and click your network from the results :
-
In the new dialogue box enter your network password in "PSK"
-
Click "Add"
-
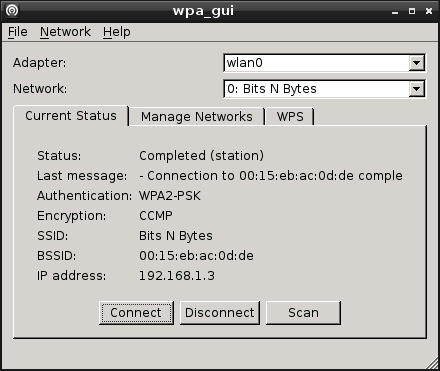
Close the "WPA_GUI"
-
-
Open the Terminal window (the logo looks like a computer monitor):
-
At the comand prompt, type the following command to find your IP address:
-
sudo ifconfig <Enter>
-
Find the "wlan0" section and look for the "inet address":


Anchor 3
Anchor 4
Anchor 5
Anchor 6
Anchor 7

Method B for Step 3.
-
Plug in a network cable to the Raspberry Pi
-
Proceed with all the Step 4
-
Disconnect the network cable
-
Plug in the USD wireless adapter
-
Reboot the Raspberry Pi by typing:
sudo reboot
-
Select the wireless network icon (looks like two computers) in the top right corner
-
Select the wireless network you want to use
-
Enter your password
-
Continue with the rest of Step 3 from this point, and skip Step 4 as it's already done
Anchor 8
Start and use your new print server
-
Start your Raspberry Pi
-
Log on
-
With the instructions provided above, the RepeterServer application should already be running in the backgroud, if not:
-
Start a Terminal window (icon looks like a computer screen)
-
Type these commands to sart or stop the server:
/etc/init.d/RepetierServer Start to start the Repetier Server
/etc/init.d/RepetierServer Stop to stop the Repetier Server
/etc/init.d/RepetierServer Restart to restart the Repetier Server
To start the video camera:
-
In the Terminal window type:
sudo /etc/init.d/mpjgstreamer start this launches the application
cd /home/pi/mjpg-streamer/mjpg-streamer-experimental to change the directory
./mjpg_streamer -o "output_http.so -w ./www" -i "input_raspicam.so" this starts the raspicam camera


Congratulations !!! You've made and installed a 3D Printer Server !!!
Repetier Server Manual: https://www.repetier-server.com/manuals/0.50/index.html
Anchor 9


The actual interface is a application that you access using an internet browser when you type in the URL, this gives you an idea of the look and feel of the RepetierServer interface:
The device that you are building is a very inexpensive by very good stand alone computer who's only job is to control your 3D Printer and be accessable over your home WiFi, and over the web. Once its running it doesn't need a screen or keyboard:


Once this is done from any computer, iPad, iPhone, or from the Raspberry Pi itself:
-
Open a web browser
-
Log on to the Raspberry Pi Repetier Server by typing the your server's URL :
Examples: 192.168.0.166:3344 or 10.0.1.17:3344
-
By going to the web cam or the control panel you can now see the wireless video feed to keep an eye on your print job !

bottom of page